 By Emma Hartley, Food Editor
Reviewed & updated August 2026
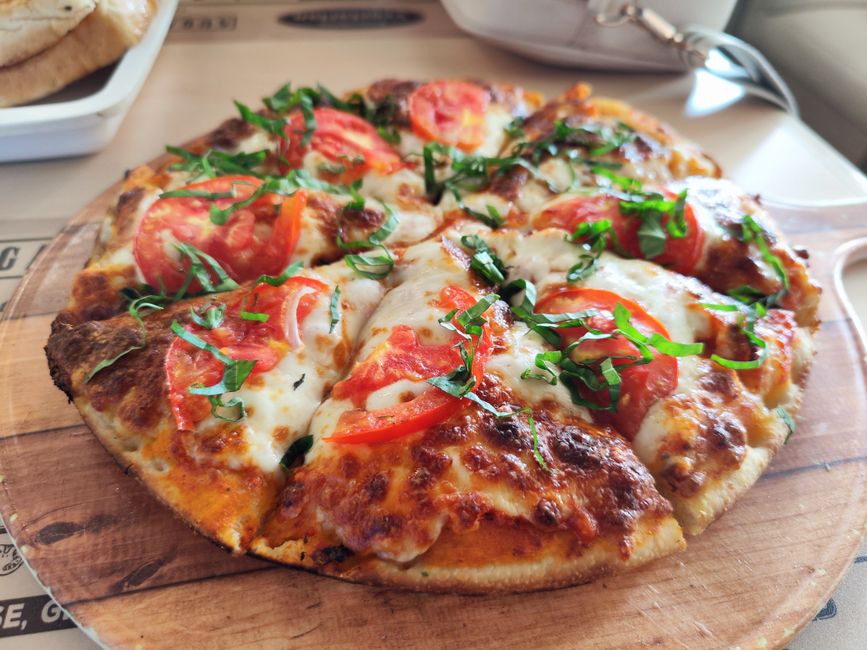
There's a reason Margherita pizza is a timeless classic: a blistered, chewy crust topped with bright tomato sauce, milky mozzarella, and fresh basil is simplicity at its most delicious. Making it at home is easier than you'd think, and the results genuinely rival your favourite pizzeria — pizza night at our place stopped meaning "order in" the day I figured out the few tricks below.
Whether you make the dough from scratch or use a store-bought ball, this is the recipe that turns pizza night into a celebration.
 In this guideCurated by Emma · 7 min read
Why you'll love this recipe
- Pizzeria-quality. Blistered crust and bubbly cheese at home.
- Simple ingredients. A handful of good components, big flavour.
- Fun to make. A perfect hands-on family dinner.
Heat is everything (the secret pizzerias rely on)
If your homemade pizza has ever come out pale, dense, and bready instead of crisp and blistered, the culprit is almost always your oven temperature — and fixing it is the single biggest upgrade you can make. Real pizzerias bake at blistering temperatures (800°F and up in a wood oven), which is what creates that signature chewy-yet-crisp crust with charred, bubbly spots in just a minute or two. You can't hit that at home, but you can get much closer than most people do. Crank your oven to its absolute maximum (usually 500–550°F / 260–290°C) and — crucially — preheat a pizza stone or steel in it for a full 30–45 minutes before the pizza goes in. That blazing-hot surface is the key: it instantly cooks the bottom of the crust, giving you crispness and a fast rise instead of a slow, soft bake that dries the toppings out before the base is done. No stone? An inverted heavy baking sheet or a cast-iron pan, preheated the same way, works surprisingly well. The hotter your setup and the more thoroughly you preheat it, the more your homemade pizza will taste like the real thing.
Tips for the best results
Get your oven as hot as it will go (use a pizza stone or steel if you have one) for a crisp, blistered crust. Stretch the dough by hand rather than rolling to keep it airy, go light on the sauce so it doesn't get soggy, and add the fresh basil after baking so it stays vibrant.
Homemade Margherita Pizza
A chewy, blistered crust topped with tomato sauce, fresh mozzarella, and basil.
☆☆☆☆☆
Ingredients
- 1 lb (450 g) pizza dough (homemade or store-bought)
- 3/4 cup pizza sauce or crushed San Marzano tomatoes
- 8 oz (225 g) fresh mozzarella, torn
- 2 tbsp olive oil
- 1/2 tsp salt
- Fresh basil leaves
- Flour or semolina, for dusting
Instructions
- Step 1. Place a pizza stone or inverted baking sheet in the oven and preheat to its highest setting (500°F / 260°C) for at least 30 minutes.
- Step 2. Divide the dough in two and stretch each into a round on a floured surface or parchment.
- Step 3. Spread a thin layer of sauce, leaving a border, and dot with torn mozzarella. Drizzle with olive oil and sprinkle with salt.
- Step 4. Slide onto the hot stone and bake 8-12 minutes until the crust is golden and blistered and the cheese is bubbly.
- Step 5. Scatter with fresh basil, drizzle with a little more olive oil, slice, and serve.
Less is more — and stretch, don't roll
The beauty of a Margherita is restraint, and overdoing it is the fast route to a soggy pizza. Go light on the sauce and cheese. A thin layer of sauce and a scattering of torn mozzarella (not a thick blanket) is all you need — pile them on and the moisture overwhelms the crust before it can crisp, leaving a wet centre. Fresh mozzarella especially is high in water, so tear it into pieces rather than slicing it thick, and pat very wet mozzarella dry first. Stretch the dough by hand, don't roll it. Gently pressing and stretching the dough with your fingertips (working from the centre outward, leaving a thicker rim) preserves the air bubbles that give you a light, chewy, blistered crust — a rolling pin crushes all that air out and leaves you with a dense, cracker-flat base. And add the fresh basil after baking, not before: basil scorches and goes black and bitter in a hot oven, but scattered on the moment the pizza comes out, it stays bright green and fragrant. Light toppings, hand-stretched dough, basil at the end — that's a true Margherita.
Make it your own
Add cherry tomatoes, a drizzle of pesto, or chilli flakes; swap in burrata for an extra-creamy version; or turn it into a white pizza with ricotta and garlic. The same method works for any toppings you love.
Frequently asked questions
No pizza stone? An inverted heavy baking sheet, preheated, works well. Cast iron also makes a great crust.
Can I make the dough ahead? Yes — homemade dough actually improves after a slow rise in the fridge overnight. Bring it to room temperature before stretching.
Why is my crust soggy? Usually too much sauce or cheese, or an oven that isn't hot enough. Go light on toppings and bake as hot as your oven allows on a preheated stone.
Why isn't my crust crispy or blistered? Your oven (or baking surface) isn't hot enough. Preheat to maximum with a pizza stone or steel inside for 30-45 minutes so the base cooks instantly.
Should I roll or stretch pizza dough? Stretch it by hand. Rolling crushes out the air bubbles that make the crust light and chewy; hand-stretching keeps them for a better texture and rim.
Read next
Related articles
- Crispy Baked Chicken Parmesan
- Garlic Butter Steak Bites
- Classic Beef Chili
- Teriyaki Salmon Rice Bowl
- Cheesy Baked Ziti
- Fluffy Veggie Omelette
Further reading & trusted sources
Where recipes usually go wrong
A home oven’s limit is heat, so preheat the stone or steel a full 45 minutes as hot as it goes. Use less sauce and cheese than feels right — an overloaded margherita steams into a soggy centre.
Emma thinks a recipe has failed if it needs a long backstory before the ingredients — so hers get straight to the point, with the small technique notes that actually change how a dish turns out. She leads The Nourish Kitchen’s recipes and food guides, writing each one to work in a real, busy kitchen rather than a photo studio. AI tools help with research and drafting, and a human checks every recipe for clarity and food safety before it publishes. Nutrition figures are honest estimates, never guarantees.